This guide aims to provide an insight into how to photograph Kingfishers in their natural environment.
Kingfishers are phenomenal hunters, but they are notoriously shy, making them tricky to photograph. However, with the correct knowledge, planning, and preparation, you can dramatically increase your chances of capturing these beautiful birds in their natural environment.
If you are looking for tips and advice on how to photograph Kingfishers, you’ve landed in the right place.
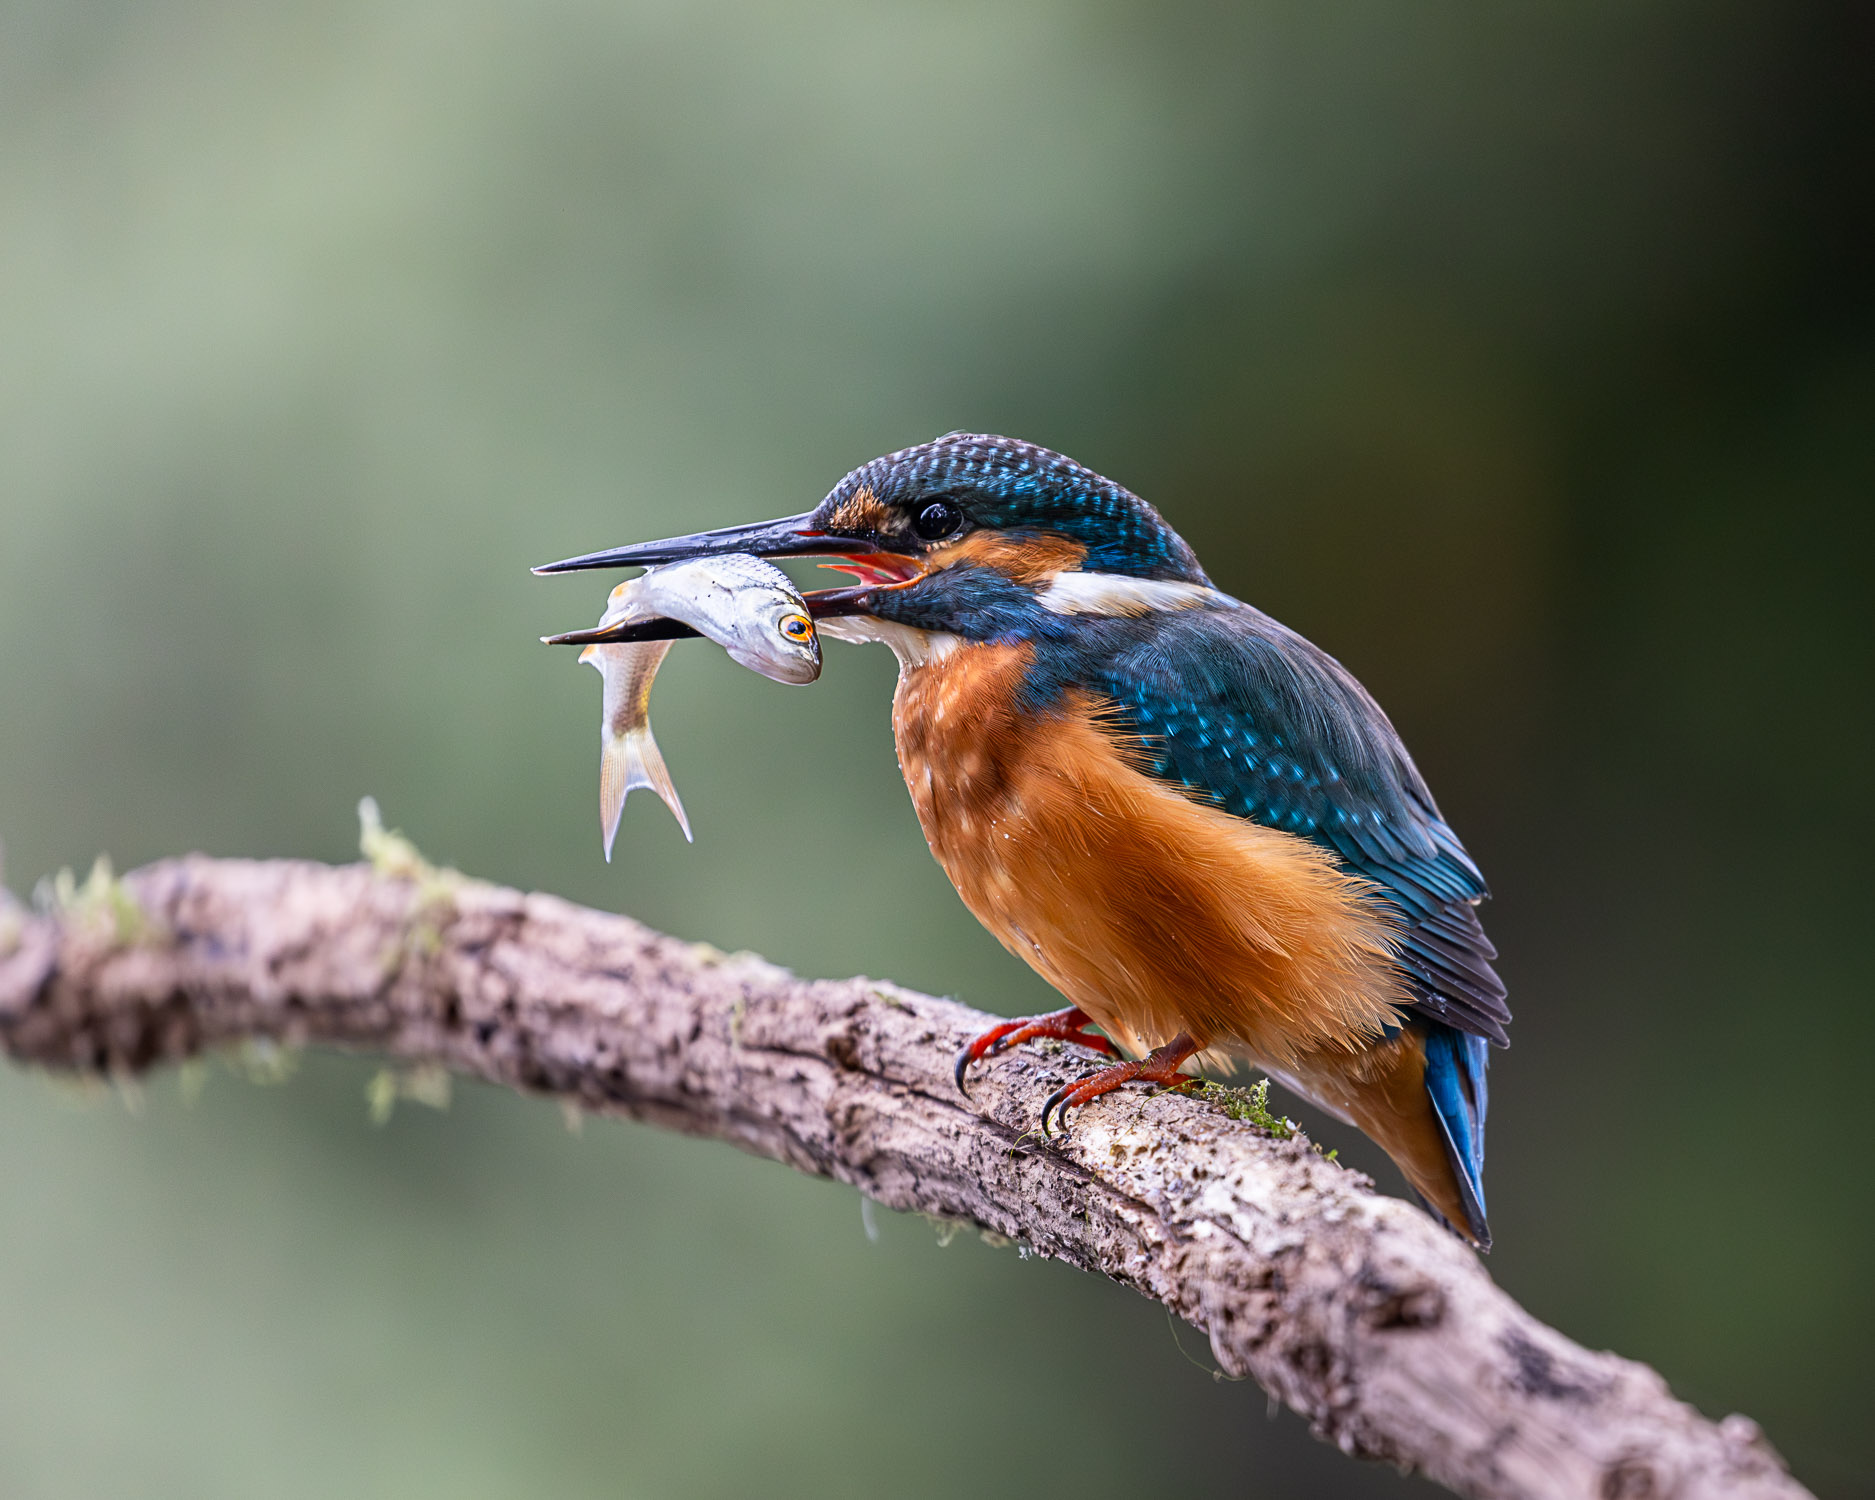
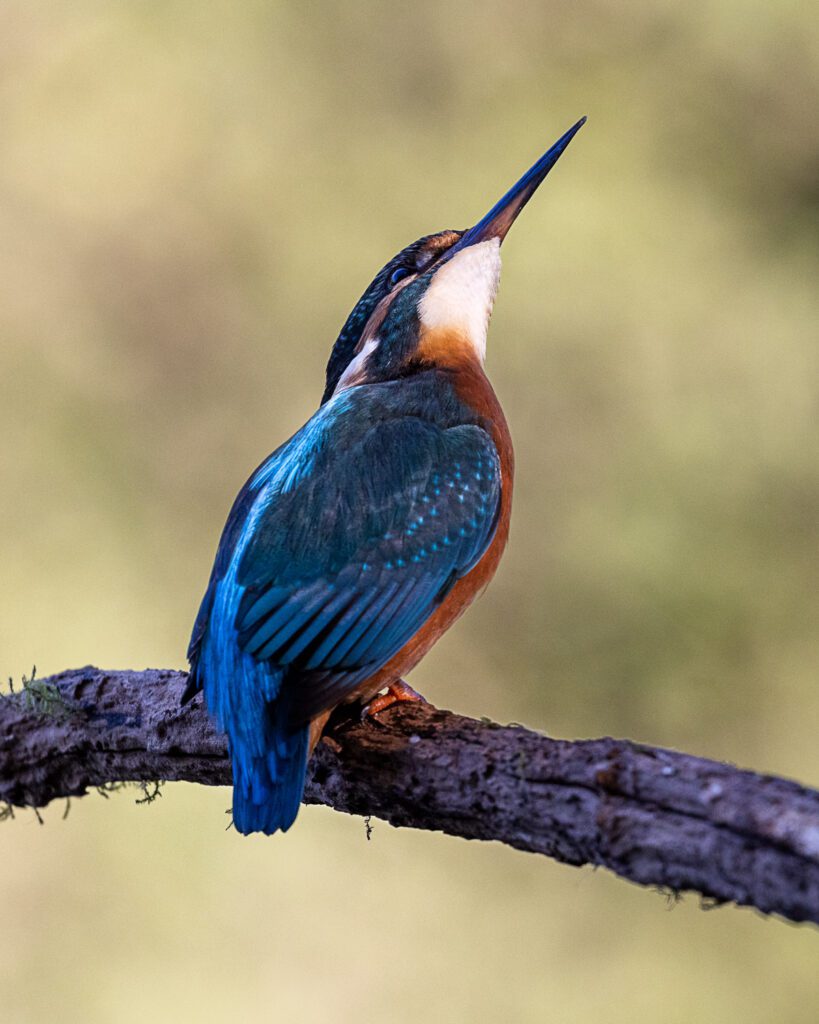
Female Common Kingfisher scanning the lake for food from one of her favourite Silver Birch perches on a local lake. ISO 1600, F/8, 1/1000
The Elusive Kingfisher
Before heading out to photograph Kingfishers, it pays to research their unique behaviours and characteristics. In wildlife photography, the more you understand about your subjects, the greater your chances of capturing your dream photographs.
Kingfishers are a Schedule 1 Protected Species
First and foremost, Kingfishers are a Schedule 1 protected species under the Wildlife and Countryside Act. As a result, it is an offence to deliberately disturb or harm these beautiful birds in any way, shape or form. Photographing Kingfishers away from their nest is legal, but they still deserve our full respect. As wildlife photographers, it goes without saying that the well-being of our subjects should be our number one priority.
Introducing the Common Kingfisher
The Common Kingfisher is an incredibly elusive bird known for its iconic blue and orange colouration. Kingfishers are relatively small birds and can be difficult to spot; blink and you’ll miss them. More often than not, most people will only ever catch a brief glimpse of a Kingfisher flying swiftly along the surface of the water. This trait is what gives them the nickname of the “Blue Flash” or “Blue Arrow”.

Kingfishers reside around still or slow-moving bodies of water, such as rivers, streams, canals, lakes, and ponds. Providing the body of water has a suitable environment and an abundance of food, there’s a good chance a Kingfisher will take up residence. Kingfishers prefer to hunt from perches such as branches which overhang the body of water. Also, similar to Kestrels, Kingfishers possess the unique ability to hover and can be seen hovering above the water in search of food. Their primary food source is small fish, though they will also catch tadpoles, newts and various insects.
Kingfishers are incredibly vocal birds, and you’ll likely hear them before you see them. Listen out for their iconic “Peep, Peep, Peep” call as they move around. Outside of their observed breeding season, Kingfishers live a solitary life. They will also defend their territory fiercely, which is particularly important during the build-up to the winter months.
So, how do you photograph Kingfishers?
Now that we’ve taken a look at the background of Kingfishers, we can put the knowledge into practice and hopefully build up to the perfect photographic opportunity. By the end of this section, you will have working solutions to the following problems:
- Kingfishers are extremely elusive birds; you can’t expect to see them without full consideration and preparation.
- They are Schedule 1 protected birds, so we must do our very best to keep our distance and not disturb them in their natural environment.
- Kingfishers are incredibly fast-moving and prefer to hunt from perches.
Equipment required to photograph Kingfishers
Below is a non-exhaustive list of equipment that will help you capture your dream photograph of a Kingfisher.
- Camera body.
- A long-reaching telephoto lens (ideally 400mm or longer). 100-400mm, 100-500mm, 150-600mm, and 300mm or 400mm primes with extenders are all strong options.
- A sturdy tripod.
- Camouflage clothing: including a jacket, trousers, face covering, gloves, etc. You can buy relatively inexpensive 3D camouflage options from dedicated outdoors outlets or Amazon.
- Camouflage netting or scrims (additional concealment for yourself and your camera setup).
- Small spring clamps are handy to pin netting together.
- A comfortable seating option, e.g. a cushioned mat or low-profile camping stool.
- Pop-up camouflage photography hide, not essential, but a convenient option for added comfort during longer trips.
Reconnaissance work
Locating a Kingfisher’s territory is the first hurdle you will encounter on your journey towards photographing them. Unfortunately, there are no shortcuts for this process short of visiting established hides and speaking to regular visitors and/or locals. For this guide, we will assume you will not be using an established hide and will instead be looking for Kingfishers in new and unvisited locations.
Camouflage will be an essential part of your reconnaissance work. Kingfishers are incredibly elusive, and odds are, if they see you, they will shy away. With this in mind, you will want to do your best to blend in with your surroundings and avoid making any sudden or unnecessary movements. Instead, you’ll want to pick an attractive spot, get comfortable and observe. There are no guidelines as to how long reconnaissance work will take. However, the more work you put in, the easier it will be when it comes to photographing the Kingfishers.
What makes an attractive location for Kingfishers?
From the Kingfisher bio above, we know that Kingfishers love slow-moving water abundant with food sources. Kingfishers also love a good perch, and they do most of their hunting from perches overlooking the water. Take the time to carefully scan your location for any overhanging bushes or branches, ideally at least 1 metre or so above the water. Kingfishers are incredibly versatile and utilise a wide range of perches. You may even find evidence of use on the perches, for example, fish scales or a smoothing of the surface caused by routine visits.

Spot the Kingfisher. An overhanging bush provides a perfect perch for this Kingfisher to scope out its next catch.
The best time of day to photograph Kingfishers
Kingfishers can be active all day, especially during breeding season when they have a lot of hungry mouths to feed. Chicks can require up to 10 fish each per day, which means that during their peak, Kingfishers could be catching a staggering 100+ fish every day whilst rearing young. Outside of breeding season, you are more likely to encounter Kingfishers during the early morning (just after sunrise) and late afternoon (a couple of hours before sunset). Personally, I find that early mornings are the most productive, especially as the nights grow longer. Longer nights mean more time without food, and as Kingfishers don’t hunt at night, you tend to find they’re more active in the morning as they look to break their fast.
Experiment with different times of day to discover which times of day the Kingfisher(s) are most active. Don’t be disheartened, though; be prepared for days without any sightings at all. Kingfishers can have extensive territories, and so there is an element of being in the right place at the right time.
Become familiar with the Kingfisher’s call
The great thing about Kingfishers is that they’re incredibly vocal. Most of the time, they will announce their presence before you’re even able to spot them. Before you head into the field, become familiar with the Kingfisher’s call. The Kingfisher’s call is easily distinguishable, and you will know when you hear it. Kingfishers will frequently call out whilst perched and/or moving between locations as they soar across the surface of the water.
The RSPB provides a soundbite of the Kingfisher’s call, which you can listen to here.
You can also utilise helpful bird identification apps such as Merlin, which make use of your phone’s microphone to listen to surrounding bird calls and provide you with a list of corresponding identifications. Merlin is a fantastic app to leave running whilst walking or sitting outdoors, you may even be surprised by the identification of nearby calls you aren’t familiar with.

Important: Please do not play sound recordings of the Kingfisher’s call in areas where you think they may be present. Kingfishers are incredibly territorial, and playing foreign calls may disturb or distress them, causing them to leave the area. Remember, it is our duty as wildlife photographers to prioritise their well-being.
Watch out for patterns and repetitive behaviour
Once you successfully locate a Kingfisher and begin to spend time observing it, you’ll likely start to notice a series of patterns and repetitive behaviour. The Kingfisher may have a favourite perch, and it may follow a specific route to get to its perches. You may also notice that the Kingfisher is more active during certain times of day. These are all observations to watch for. The more you begin to build up a picture of the Kingfisher’s habits, the easier it will be to select the perfect location to establish your photography setup.
Scout the perfect location for your camera setup
The final piece of the puzzle is scouting out the perfect spot to set up your camera. There are a couple of elements to consider here. First, take note of the direction of the light throughout the day. Light is the most crucial element of photography, making this a top priority. You don’t want to be shooting into the sun. Instead, try to find a location where the sun sits on your shoulder. In an ideal world, overcast days generally produce the most pleasing results thanks to the softer, more diffused light. However, early morning and late afternoon light can provide beautiful golden tones on your subject and surrounding elements. Consider the time of day you will be shooting and the weather forecast.
Secondly, to produce the most pleasing results, you will want to minimise the amount of nearby distractions. A good rule of thumb is to select a perch where the background is around 20 metres away. When using a wide aperture, a distant background will produce beautifully smooth bokeh, complementing your subject. The image below is a perfect example of creating simplicity by ensuring the background is distant enough to be blurred with a wide aperture, complementing the Kingfisher.

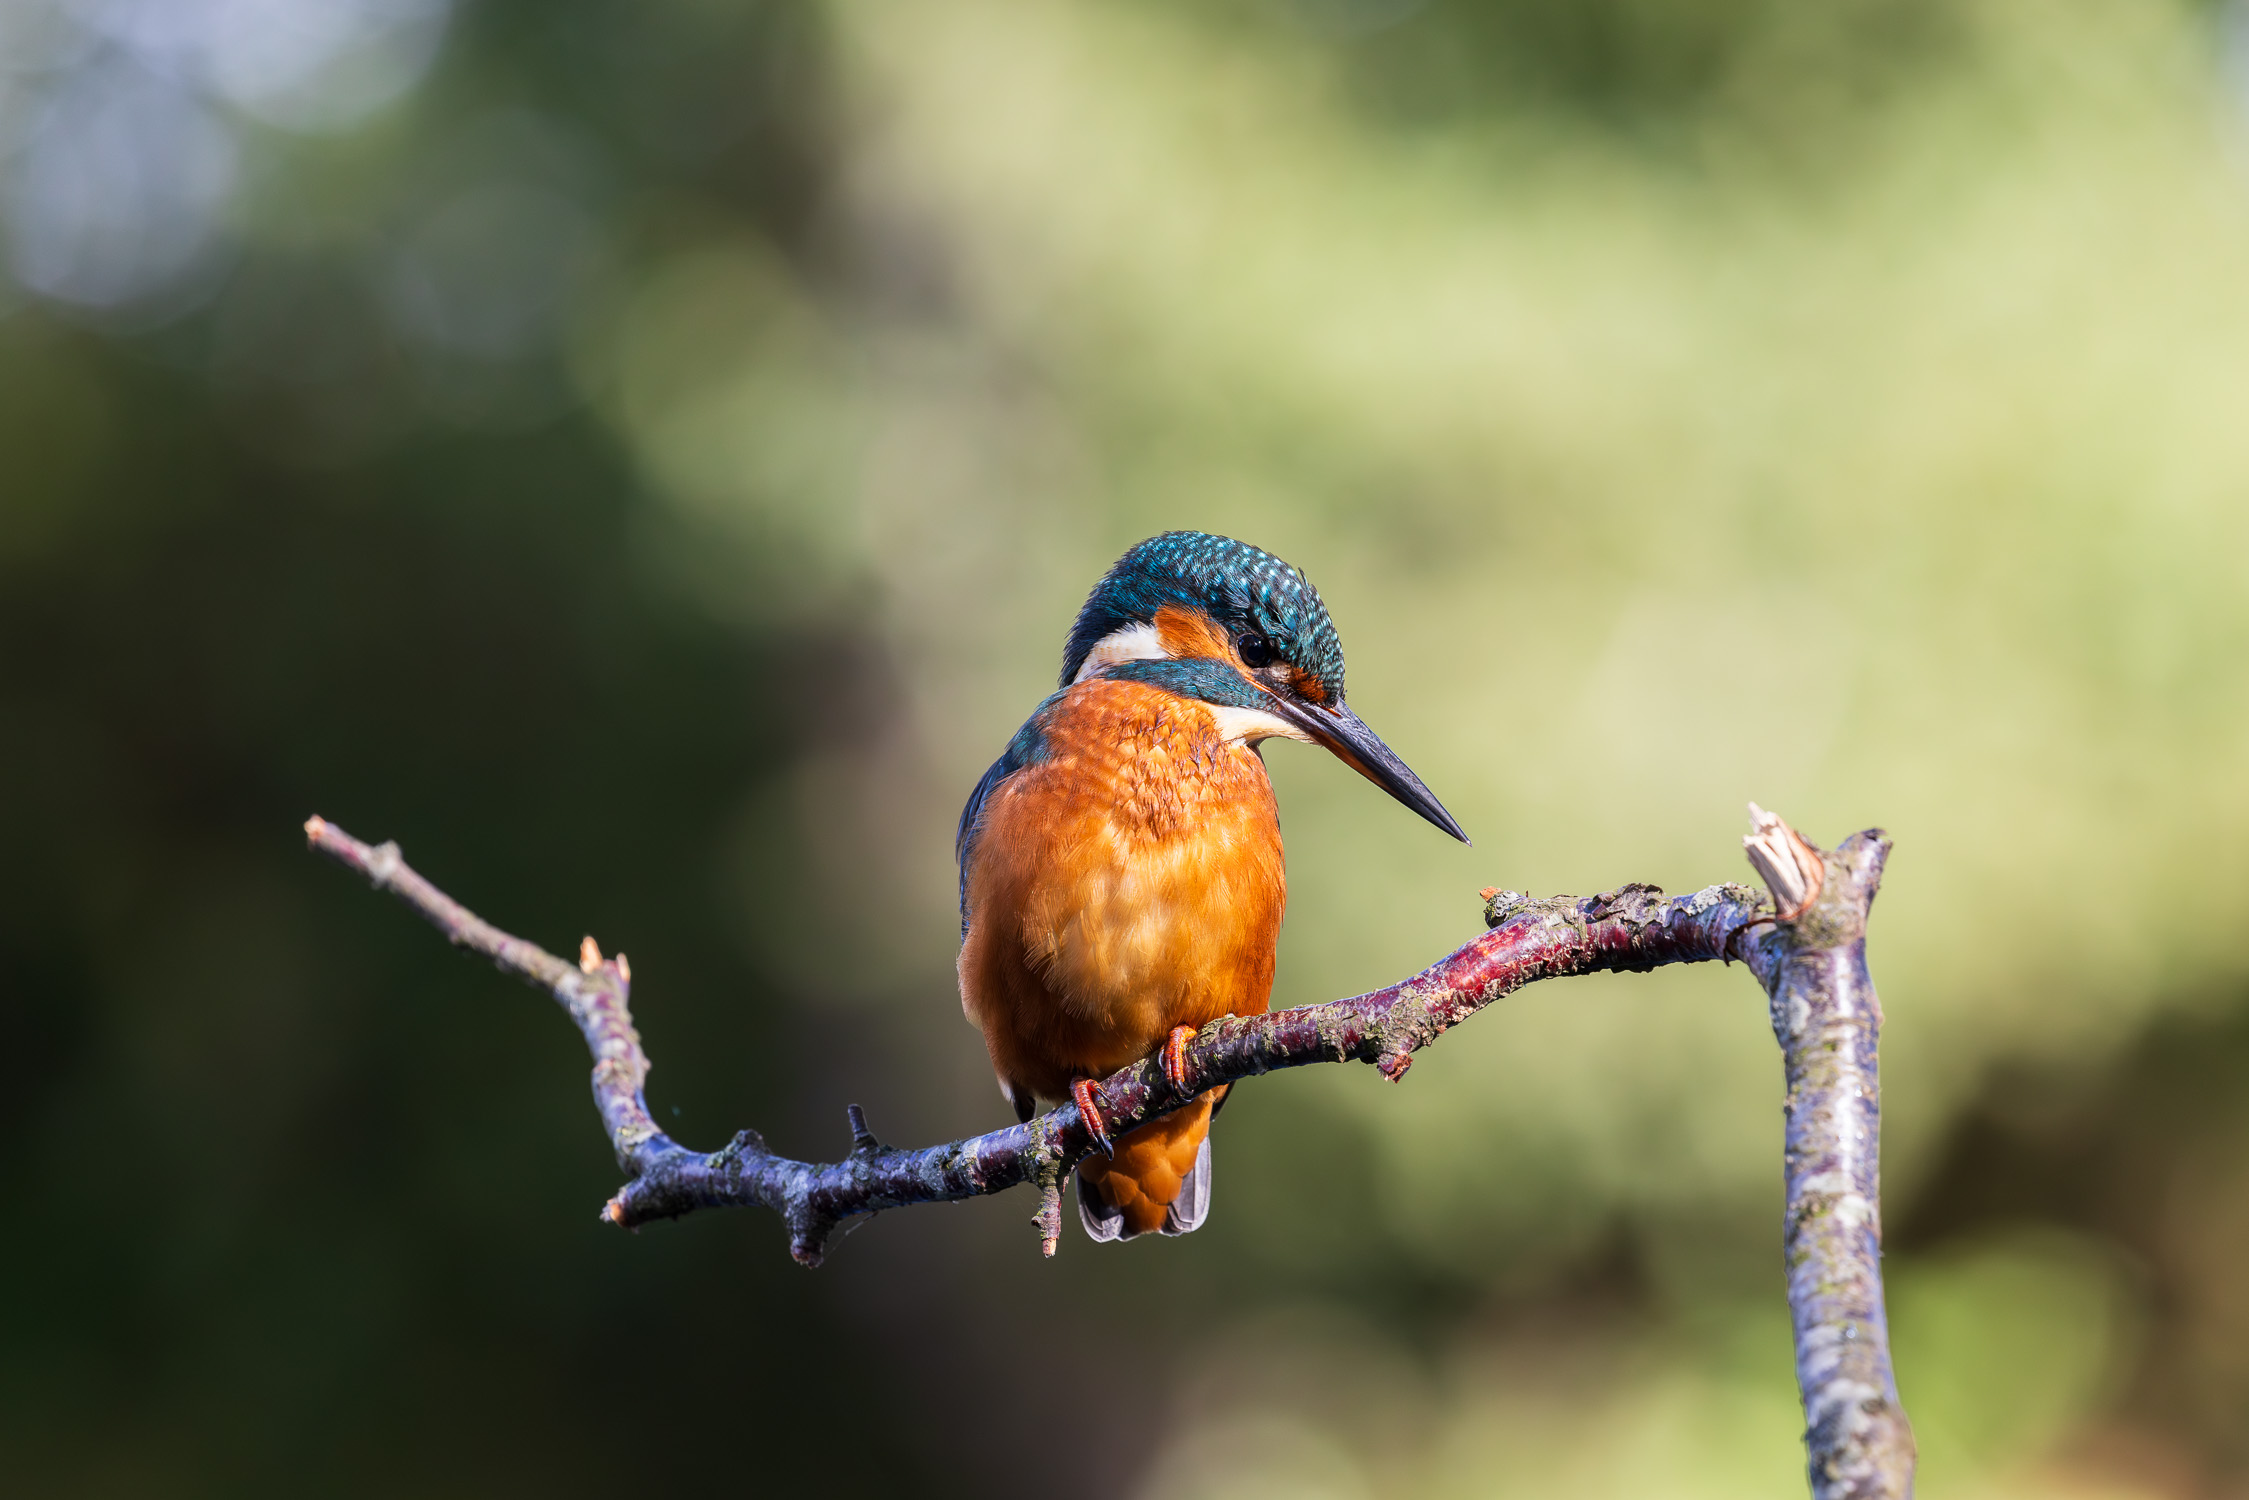
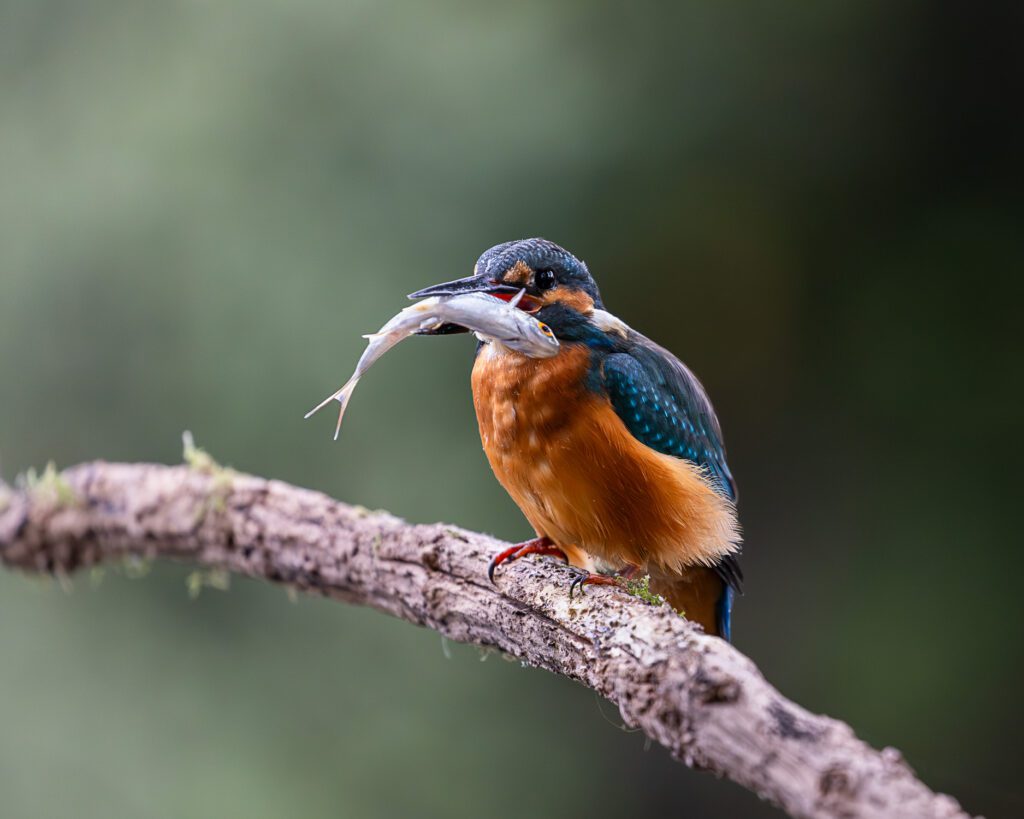
A beautiful female Kingfisher perched on what I think was an old horse chestnut branch overlooking a local lake. ISO 1600, F/5.6, 1/600th.
Finally, search for a location that will allow you to blend in and conceal yourself with the aid of your camouflage. The more concealed you are, the greater your chances of remaining undiscovered, increasing your chances of capturing the Kingfisher in action.

An example of using camouflage netting to conceal yourself and your photography equipment. In addition to using netting and scrims, you can also gather fallen foliage and branches and arrange them around your equipment for added natural concealment.
Putting Knowledge into Practice: It’s Time to Photograph Kingfishers
You’ve done the hard work, now it’s time for the reward! Don’t get complacent, though; despite discovering the perfect location and time of day, you’ll need a bucket load of patience and persistence to photograph Kingfishers. There will be days when the Kingfisher(s) are incredibly active, and there will be days when they won’t show at all. There’s also an element of luck involved. That said, there are several things under your control as a photographer to increase your chances of successfully securing your dream Kingfisher photographs.

Choose the correct camera settings
Selecting the correct camera settings and being aware of changing environmental factors, such as the direction of and/or the amount of available light, will pay dividends. For perched Kingfishers with little movement, shutter speeds of 1/250th or faster are a good starting point. If the Kingfisher is perched and moving, you’ll want to increase your shutter speed accordingly to around 1/1000th, depending on the action. However, using slower shutter speeds to capture and emphasise movement can produce beautifully unique photographs.
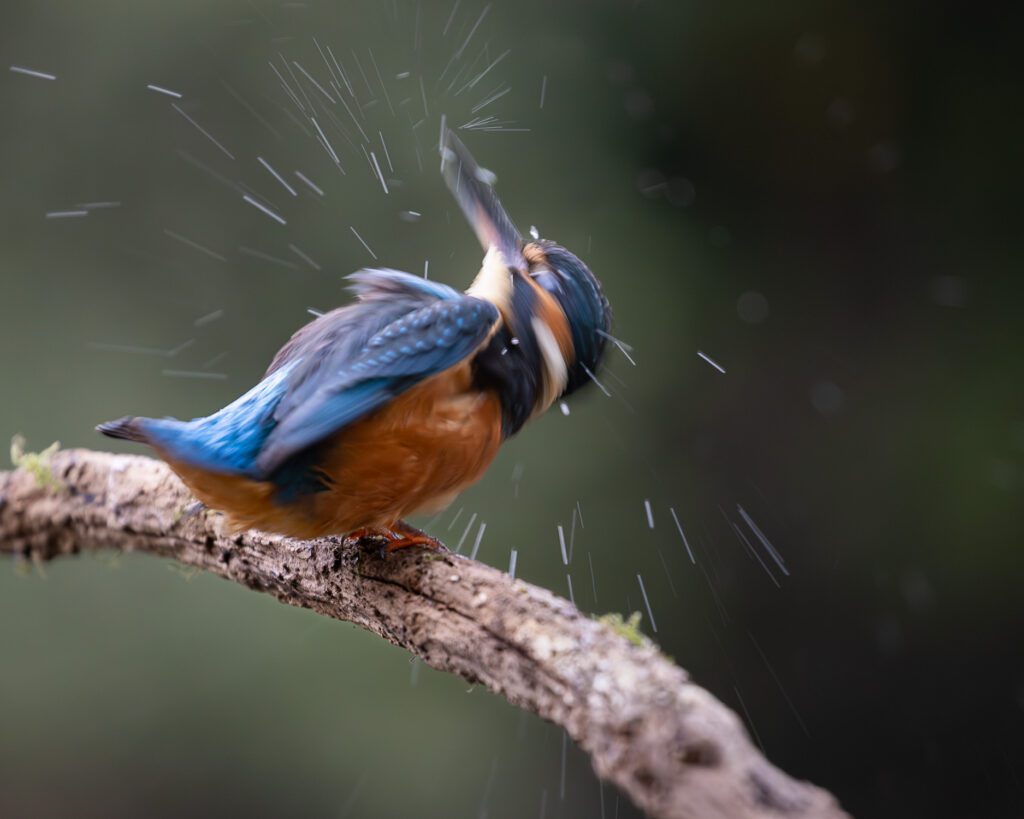
I captured the above image of a Kingfisher shaking water from its feathers after emerging from a dive. The photograph was taken with a deliberately slow shutter speed to emphasise the shaking movement and displacement of water. ISO 800, 1/200th, F/5.6
Kingfishers in flight require significantly faster shutter speeds. Due to their small size and sheer speed, shutter speeds of at least 1/2000th will be necessary to freeze any action and produce tack-sharp images. Setting your camera to manual mode with auto ISO is an efficient way to manage camera settings. Manual mode gives you complete control over your aperture and shutter speed. Adopting manual mode allows you to dial in a shutter speed of 1/2000th whilst keeping your aperture wide open, and thanks to auto ISO, your camera will calculate the required ISO to obtain a balanced exposure. Not having to worry about ISO is one less thing to worry about during high-pressure situations.
Subject tracking and drive modes
Subject tracking capabilities have advanced significantly over the past couple of years, thanks to the release of mirrorless cameras. Through AI learning, cameras can track subjects faster and more accurately than ever before, and photographers have greater control over sensitivity and subject tracking. For anyone with a modern mirrorless camera, you will want to change your autofocus to subject detection. Within your camera’s custom settings, there will be an option to define your subject. Typical options include people, animals or vehicles. For Kingfishers, set your camera’s subject selection to animals.
Using the Canon R5 as an example, for Kingfishers, you would use the following settings:
- AF operation set to “Servo” for continuous subject tracking.
- AF Method set to “Tracking”.
- Subject to detect set to “Animals”.
- Eye detection set to “Enable”.
- Continuous AF set to “Disable”, unless shooting video. Continuous AF enabled is a significant drain on battery power.
- Servo AF set to “Case 2 – Continue to track subjects, ignoring possible obstacles”.
For those using older DSLRs, you will still be able to assign similar settings to the above; however, you may not have access to advanced features such as subject detection and eye detection. In this case, you would need to use an expanded AF area for moving Kingfishers and single-point AF for slow-moving perched birds to allow you to maintain focus on the Kingfisher’s eye.
Simplify your compositions
Wildlife photography is about capturing the beauty of nature, and what better way to illustrate your subject than with a simplified composition? When selecting a location to photograph Kingfishers, it pays to consider your background, particularly if you’re hoping to achieve captivating portrait shots. A distant background combined with a wide aperture will create beautifully soft bokeh, ensuring that there are no distractions to your subject. Perfect backgrounds for Kingfishers include leafy-green trees, foliage, and even the water, depending on the angle from which you are shooting. Below are a couple of examples featuring perched Kingfishers with beautiful complementary backgrounds.
A perched female Kingfisher with a beautiful leafy-green bokeh background. In this composition, the background was approximately 30 metres away from one of the Kingfisher’s favourite perches on the lake, the silver birch. ISO 1600, F/8, 1/1000.

Looking down at the beautiful Kingfisher with the water as a backdrop.
Capture unique behaviours
Once you get over the initial rush of photographing your first Kingfisher, you can slow things down and focus on capturing the range of unique behaviours that Kingfishers display. From the iconic head bobbing to slapping fish against the perch, Kingfishers are incredibly animated birds. Capturing these unique behaviours can elevate your photographs and add an element of charm to your work.

Above, a photograph of a perched Kingfisher ejecting a pellet, undigestible bones and scales from a previous meal.
A photograph of a juvenile Kingfisher looking up and tracking the threat of a group of passing crows.
Camouflage and concealment
Camouflage and concealment have already been touched on earlier in this guide; however, it’s worth mentioning again. Concealment is a crucial factor in photographing Kingfishers. To avoid disturbing these beautiful, iconic birds, they need to believe that you aren’t there. The best way to do this is to minimise movement and blend in with your surroundings. You should consider concealing yourself, your camera, lens, and tripod. Camouflage doesn’t have to be expensive. Relatively inexpensive options, including 3D camouflage clothing and camouflage scrims and netting, are perfect for remaining undetected.
Camouflage photography hides are another option, allowing you to remain hidden whilst providing a little more freedom of movement. Examples include the Nitehawk pop-up hide, which is essentially a camping chair with an integrated umbrella-type camouflage system which can be pulled over you to create a hide.
Introduce your own perch
One final tip for photographing Kingfishers is to introduce your own perch. Kingfishers are very inquisitive and accepting of new perches. A good example of a perch is a fallen branch that is approximately 1 metre in length and has a 90-degree angle to it. Ideally, when introduced, the perch should stand around 1 metre above the water. By carefully introducing your own perch, you add an element of control, as you can place it in a location free from distractions. The more natural-looking, the better – try to select a branch that fits in with the surrounding environment. If the Kingfisher likes the perch, there is a good chance it may return to it, especially if it has successfully caught a fish from it.
If you are going down the route of selecting your own perch, please be respectful and avoid using branches from living trees. Odds are, there are plenty of fallen branches you can find on the ground due to past storms.
Summarising How to Photograph Kingfishers
Kingfishers are incredibly elusive and arguably one of the most challenging birds for wildlife photographers to photograph. However, the effort is more than worth it; having the opportunity to spend time with these iconic birds is priceless. The more time you spend with them, the more you will come to love their beautifully photogenic colours and behaviours.
Enjoy the process! There’s no greater feeling than capturing a Kingfisher on camera for the first time. Before you know it, you will be an expert in field craft, allowing you to get respectfully closer to your subject without the danger of disturbing or distressing it.
Experiment with camera settings, backgrounds and environmental details that can add value to your images and help tell the tale of the iconic Kingfisher. Don’t forget to look out for unique behaviours such as head bobbing, fish bashing, pellet ejection, and shaking water from feathers after a dive.
Most importantly, remember that Kingfishers are Schedule 1 protected birds. Avoid any action that will ultimately disturb or distress these beautiful birds.


Bonus sequence of a female Kingfisher swallowing a rather large catch!
Thanks for Reading!
I hope this guide has provided you with a clear understanding of the techniques and considerations needed to photograph Kingfishers. If you found this guide insightful, please let me know in the comments section below. Please also consider visiting my Gallery and Blog for a range of valuable nature and landscape photography content.
Your Next Challenge: Discover How to Photograph Barn Owls Ethically
Now that you’ve managed to capture the beauty of the common Kingfisher, you’re ready for the next challenge, right? Photographing the iconic barn owl.
Mastering barn owl photography isn’t as hard as you may think. Knowing what to look for and when is half of the battle. In my deep dive into photographing wild barn owls, I provide you with the foundations you need to excel as a wildlife photographer. You’ll learn the fundamentals of expert fieldcraft, the importance of concealment, and how to create stunning compositions of barn owls in their natural environment, with respect at the heart of every move you make.